This article will give you a step-by-step guide for solving low back pain with exercise, based on a combination of scientific research and hands-on experience.
A few things should be noted before we get into how to build a strong, protective core for your lower back:
1) The ultimate goal when exercising to prevent low back pain is to be able to use a moderately heavy total body strength-training program.
2) You need to check certain things of your list before you start weight training, such as the ability to stabilize the lower back during movement.
3) If you’re suffering from a specific lower back injury (not just chronic low back pain), or have something like degenerative disc disease, you want to get medical help before engaging in any of these activities.
Follow these steps to build a stronger core and eliminate low back pain:
Step#1: Learn to stabilize the pelvis.
You need to be able to stabilize your pelvis in a neutral position because this will improve alignment of the lumbar spine of the lower back. Proper alignment of the lumbar spine is known as “neutral posture” and it is necessary to be able to progress to movements such as deadlifts and squats.
When lying on your back with your knees bent, find the pointy parts of your pelvis in the front. Next, place your fingers about one-third of the way between the pointy part of your pelvis and your bellybutton.
Take deep breaths and as you exhale try to draw your bellybutton toward the floor and your spine. At the same time, perform a Kegel exercise—the easiest way to describe it is the motion you do when you stop the stream of urine when doing to the bathroom.
Your fingers should dip down toward the floor as you stabilize the pelvis. Done incorrectly, you will generally feel your abdominal area pushing up into your fingers due to the fact that your abs are doing the work instead of the deep pelvic muscles.
Next, you can try stabilizing the pelvis during motion, such as walking, doing bodyweight squats, or when going up the stairs.
Step #2: Learn to perform a hip hinge without flexing the lower back.
Next up is to improve coordination and strength of the primary lower back muscles, the erector spinae. The function of these muscles is to maintain optimal posture of the spine during exercise.
Beginners can learn to extend the lumbar spine safely by training an exercise called the waiter’s bow: Stand upright and stabilize the pelvis and spine. Then bend forward by flexing the hips and preventing flexion movements in the lower back—it should look like you’re hinging your entire upper body forward from the hip joint.
Step #3: Perform lower back extension training with pelvic stabilization.
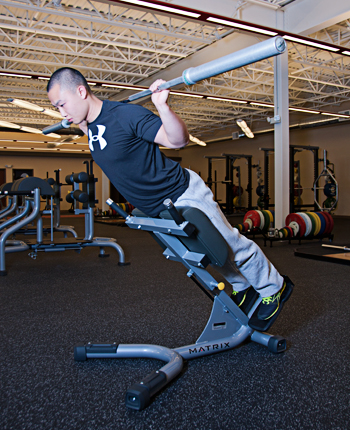
Strengthen the lower back muscles by performing a body weight back extension on an incline extension bench.
One research study found that pelvic stabilization increased recruitment of the erector spinae muscles during a back extension exercise, effectively reducing low back pain. A second study found a similar result, whereas when participants failed to stabilize the pelvis, no benefit was realized.
Using an incline back extension machine will help beginners to avoid hyper-extending the back at the top of the motion (when you are most upright). You can eventually progress to adding weight by holding a medicine ball or dumbbell at your chest.
Step #4: Do total body strength training with moderate intensity loads.
A basic total body strength training program will help you achieve a couple of specific goals that will have the effect of reducing back pain.
First, it will strengthen the muscles on both sides of the body (known as the agonist and antagonist muscles), which will help balance the forces on the spine and create a strong framework so that you can progress to the bigger bang for your buck exercises.
Second, it will build muscle and can improve body composition by lowering body fat.
Third, It will allow you to gain strength and coordination when moving the lower back and hip muscles.
For example, a study of obese adults who complained of low back pain found that doing a full body weight-training program with a load that was 60 percent of the maximum amount possible resulted in a 64 percent reduction in the incidence of pain. The trainees became much more active in their daily lives because they were no longer scared of moving.
A second training program that only included core exercises was not effective for reducing low back pain or improving mobility.
Step #5: Progress to include free weight lifts & higher volume—you’ll lose body fat!
Losing excess body fat, especially belly fat that is located deep in the abdomen, is essential for a healthy lower back because it will reduce wear and tear on the discs of your spine. Best of all, once you lean and strong, you’ll have a six-pack!
The powerful benefit of strength training for fat loss and solving low back pain is evident with a study that compared the effect of aerobic exercise with strength training (moderate-intensity loads of 53 to 72 percent of the 1RM) in low-back pain sufferers.
Results found that the weight-training group lost 3.7 percent body fat and gained muscle. They also gained strength and significantly reduced their pain and disability, while recording a better quality of life.
On the other hand, the aerobic group lost both fat (2 percent) and muscle (they reduced bodyweight by 2.5 kg), and had no changes in low back pain or strength capacity.
Make it happen by learning the primary free weight exercises: Squats, deadlifts, lunges, step-ups, bench and overhead press, rows, and pull-downs or pull-ups. Training with these exercises and select lower back, ab, and machine-based exercises will build muscle strength and help you lose body fat.
Step #6: Prioritize deadlifts for a bulletproof back.
A recent study showed that participants with baseline levels of lower back and hip strength performed deadlifts for 12 weeks and radically reduced their pain, while gaining strength and mobility.
This study provided the following checklist of key exercises you should be able to do before engaging in a serious deadlift program in order to ensure success.
* Muscle endurance of the core musculature as demonstrated by the Biering–Sørensen test (shown above). You should be able to perform the test for 60 seconds Pain free.
* The ability to perform a hip hinge such as the waiter’s bow, which was described in #3.
* The ability to maintain a neutral lumbar spine (remember to stabilize the pelvis before you start) throughout a deep squat motion.
The trainees in the study who mastered theses skills had the most robust reduction in pain intensity and increases in strength. Participants who did not complete the checklist had the worst outcome and experienced little change in their low back pain.
Step #7: Train squat variations to strengthen weak links & improve mobility.
Squats will build flexibility and structural balance throughout the body, making appropriate variations a must for all trainees, but especially novices, who want to prevent back pain FOREVER.
It’s best to master single-leg squats first, starting with the front-foot elevated squat, progressing to regular split squats with a cable row, and finally dumbbell split squats. These are the perfect exercise to focus on stabilizing the lower back and maintaining a neutral lumbar spine throughout the motion.
More advanced trainees will benefit from heavy front and back squats because analysis of muscle activation shows that the squat actually requires greater activity of the lower lumbar region of the lower back than the deadlift.
For example, when a heavy squat (80 percent of maximal load) was compared to a heavy deadlift, the squat required about 34 percent greater activity of the lower lumbar region than the deadlifts. Deadlifts produced greater activation of the upper region of the lower back.
So, train both squats and deads, and if you’re training both in the same workout, do squats first, when your lower back is fresh. This will warm it up for pulling heavy loads off the floor.
Step #8: Don’t do isolated ab training like sit-ups, etc.
Avoid isolated “core” training that often puts pressure on the spinal discs and can inadvertently cause injury and more pain. Even spinal stabilization exercises that promote muscle endurance, such as the plank are not recommended unless they are performed with perfect form.
Common technique errors with the plank include caving at the lower back (sway whack position) for creating an unstable base with the shoulders.
Instead of tempting pain and injury to your lower back with ab training, use the steps in this list for a strong back that will keep you pain-free and active for life.